MQTT学习笔记📚
ESP32连接MQTT云端
这里以温度(temperature)为例,通过esp32发送到OneNet平台。
1. 前言:为什么选 MQTT?
- 轻量级:基于 TCP 长连接,报文头仅 2 B 起步,低带宽友好。
- 发布 / 订阅:发送者与接收者无需感知彼此 IP,仅要知道共同的 Topic。
- QoS 三档:QoS0(至多一次)、QoS1(至少一次)、QoS2(仅一次)可按需权衡实时性与可靠性。
- 心跳保活:
PINGREQ/PINGRESP保证掉线可被快速察觉。
在 IoT 场景里,“海量设备 + 低时延 + 异构网络” 几乎天然指向 MQTT。视频中作者选择 OneNET(和云)做演示,其后台已内置 MQTT Broker 与物模型,可少走很多弯路。
2. OneNET 云端准备
-
注册与登录:访问OneNET官网(https://one.net.cn/)注册账号并登录。
-
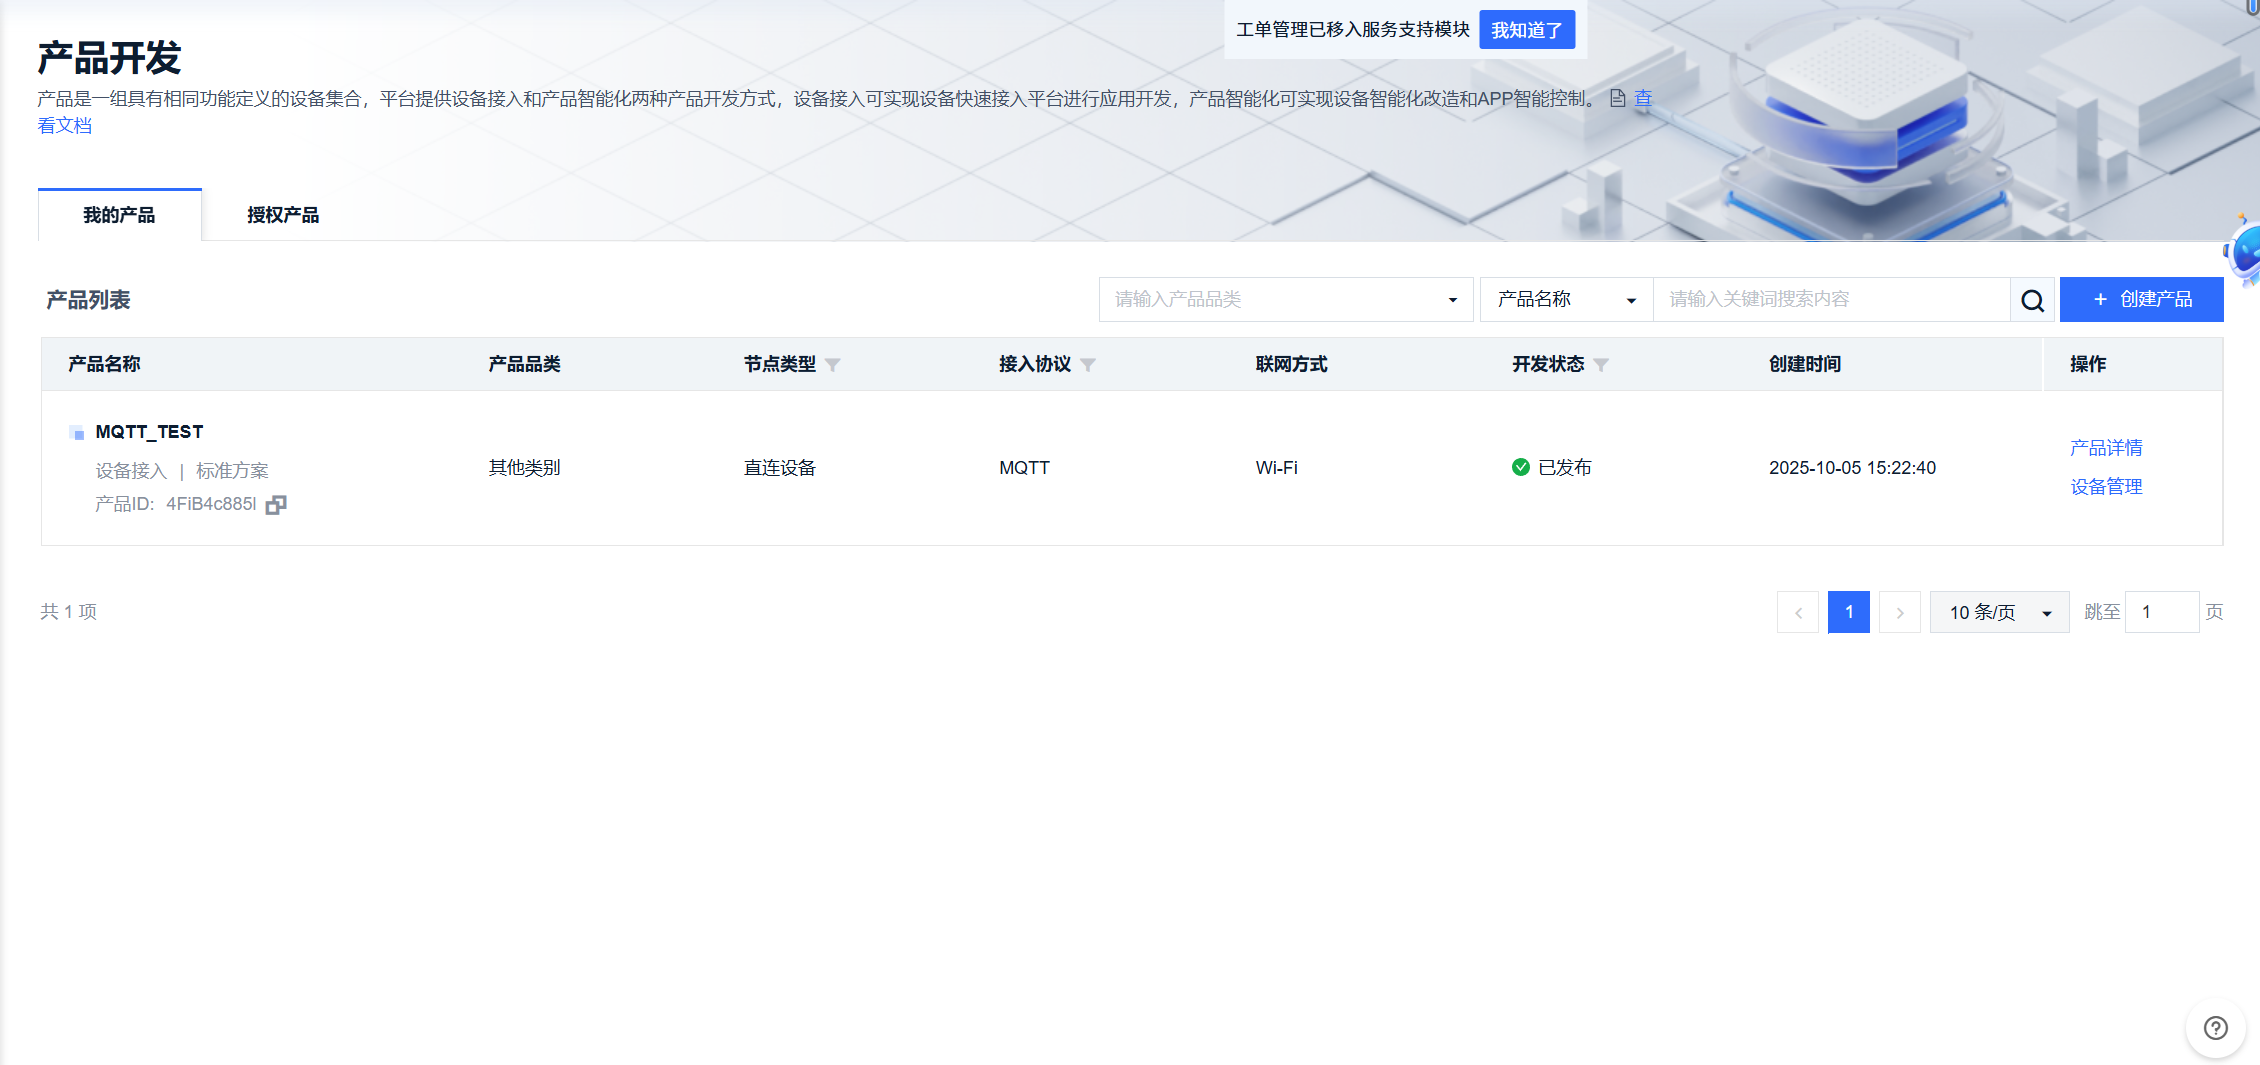
创建产品:
- 进入“产品开发” > “添加产品”。
- 选择协议类型为“MQTT”,填写产品名称、描述、联网方式(WiFi或其他)。
- 记录产品ID(Product ID)。
-
添加设备:
- 在产品下添加设备,填写设备名称。
- 记录设备ID(Device ID)和主密钥(Access Key,用于认证)。
-
创建数据流(可选,用于数据上报):
- 定义数据流如“温度”、“湿度”等,记录标识符。
-
MQTT连接信息:
-
Broker地址:
mqtt.heclouds.com或183.230.40.39(端口1883)。 -
用户名格式:
产品ID|设备ID(例如:123456|abc123)。 -
密码:主密钥。
-
主题示例:
-
上报主题:
/sys/{产品ID}/{设备ID}/thing/event/property/post -
订阅主题:
/sys/{产品ID}/{设备ID}/thing/service/property/set
-
-
👉 总结:最后我们需要 5 个核心字符串
ProductID        → mqttUser
DeviceName       → mqttClientID
Password(Sign)   → mqttPasswd
Topic POST       → topicPost
Topic REPLY/SET  → topicReply / topicSet
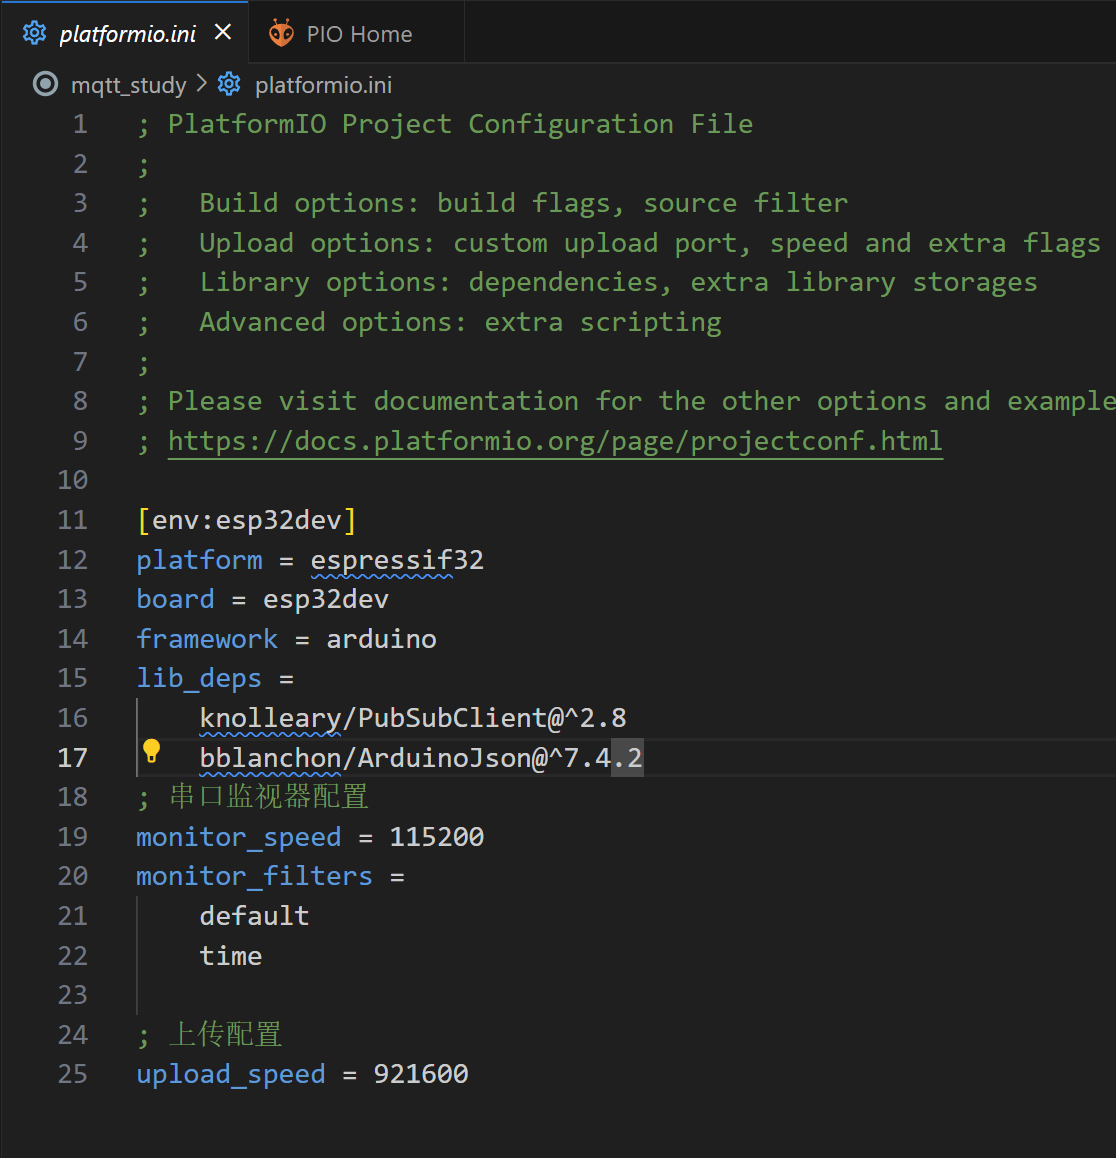
3. 本地开发环境配置
- Arduino IDE 2.x / VS Code + PlatformIO 均可
- 安装核心
- ESP8266 Core ≥ 3.1.2(如选 NodeMCU/Wemos D1)
- ESP32 Core ≥ 3.0.0(如选 ESP32-DevKitC)
- 安装库:PubSubClient(Nick O’Leary),DHT sensor library(Adafruit,可选)
- 选择开发板 & 端口,波特率 115200
- 若用 HTTPS/WSS 方案,需要额外安装
BearSSL/WiFiClientSecure.h证书,本文以不加密1883端口示例演示
4.软件程序设计
代码为:
#include <WiFi.h>
#include <PubSubClient.h>

// ============ WiFi 配置 ============
const char* ssid = "Eighteen-WiFi";
const char* password = "zxcvbnm1818";

// ============ MQTT 配置 ============
const char* mqtt_server = "mqtts.heclouds.com";
const int mqtt_port = 1883;
const char* mqtt_user = "4FiB4c885l";
const char* mqtt_client_id = "ESP32_Study";
const char* mqtt_password = "version=2018-10-31&res=products%2F4FiB4c885l%2Fdevices%2FESP32_Study&et=2106806220&method=md5&sign=2G8tg7DFHwihpNBLxLr7PA%3D%3D";

// ============ 主题定义 ============
const char* topic_property_post = "$sys/4FiB4c885l/ESP32_Study/thing/property/post";
const char* topic_property_reply = "$sys/4FiB4c885l/ESP32_Study/thing/property/reply";
const char* topic_property_set = "$sys/4FiB4c885l/ESP32_Study/thing/property/set";

// ============ 固定的JSON数据(温度值50)============
const char* json_data = "{\"id\":\"123\",\"version\":\"1.0\",\"params\":{\"temperature\":{\"value\":50}}}";

WiFiClient espClient;
PubSubClient client(espClient);

unsigned long lastPublish = 0;
bool isFirstConnect = true;

// ============ WiFi连接 ============
void setup_wifi() {
  Serial.println("
========== ESP32 Starting ==========");
  Serial.printf("Free memory: %d bytes
", ESP.getFreeHeap());

  Serial.print("WiFi connecting");
  WiFi.mode(WIFI_STA);
  WiFi.begin(ssid, password);

  while (WiFi.status() != WL_CONNECTED) {
    delay(500);
    Serial.print(".");
  }

  Serial.println();
  Serial.printf("✓ WiFi Connected | IP: %s
", WiFi.localIP().toString().c_str());
}

// ============ MQTT消息接收回调 ============
void callback(char* topic, byte* payload, unsigned int length) {
  Serial.print("
📩 ");
  for (unsigned int i = 0; i < length; i++) {
    Serial.print((char)payload[i]);
  }
  Serial.println("
");
}

// ============ MQTT连接 ============
void reconnect() {
  if (client.connect(mqtt_client_id, mqtt_user, mqtt_password)) {

    if (isFirstConnect) {
      Serial.println("✓ MQTT Connected");
      Serial.println("========== Ready ==========
");
      isFirstConnect = false;
    }

    // 订阅主题
    client.subscribe(topic_property_reply);
    client.subscribe(topic_property_set);

  } else {
    Serial.printf("✗ MQTT Failed: %d
", client.state());
  }
}

// ============ Setup ============
void setup() {
  Serial.begin(115200);
  delay(1000);

  setup_wifi();

  client.setServer(mqtt_server, mqtt_port);
  client.setCallback(callback);
  client.setBufferSize(512);

  reconnect();
}

// ============ Loop ============
void loop() {
  // 维持MQTT连接
  if (!client.connected()) {
    static unsigned long lastAttempt = 0;
    if (millis() - lastAttempt > 5000) {
      lastAttempt = millis();
      reconnect();
    }
  } else {
    client.loop();

    // 每30秒发送一次温度值50
    unsigned long now = millis();
    if (now - lastPublish > 30000) {
      lastPublish = now;

      if (client.publish(topic_property_post, json_data)) {
        Serial.println("📤 Sent: temperature = 50");
      } else {
        Serial.println("✗ Send failed");
      }
    }
  }
}
注:platformio要设置波特率
代码拆解
mqtt.setBufferSize(512):把默认 256 B 缓冲扩为 512 B,避免长 JSON 被截断。millis()节流:非delay(),确保主循环仍对 MQTT 心跳保持响应。mqtt.state()返回 -4 表示无法连接 Broker;-2 表示网络可达但连接超时(见附录 A)。
代码逐行详细解释
代码概述
这是一个ESP32连接OneNET物联网平台的MQTT客户端程序,实现以下功能:
- WiFi连接
- MQTT连接和认证
- 定时上报温度数据
- 接收云端消息
- 自动重连机制
库文件包含
第1-2行:包含必要的库
#include <WiFi.h>
#include <PubSubClient.h>
详细解释:
| 库名称 | 功能 | 说明 |
|---|---|---|
WiFi.h | ESP32 WiFi功能库 | ESP32 Arduino核心库自带,无需安装 |
PubSubClient.h | MQTT客户端库 | 需在库管理器安装(作者:Nick O'Leary) |
作用:
#include是C/C++预处理指令- 将外部库的功能引入到当前程序
- 使用
<>表示系统库路径
配置参数
第4-5行:WiFi凭证
const char* ssid = "Eighteen-WiFi";
const char* password = "zxcvbnm1818";
详细解释:
语法分析:
const- 常量修饰符(值不可修改)char*- 字符指针类型(C风格字符串)ssid- Service Set Identifier(WiFi网络名称)password- WiFi密码
注意事项:
- SSID区分大小写
- 密码长度通常8-63个字符
- 实际项目不应硬编码密码
第7-11行:MQTT服务器配置
const char* mqtt_server = "mqtts.heclouds.com";
const int mqtt_port = 1883;
const char* mqtt_user = "4FiB4c885l";
const char* mqtt_client_id = "ESP32_Study";
const char* mqtt_password = "version=2018-10-31&res=products%2F4FiB4c885l%2Fdevices%2FESP32_Study&et=2106806220&method=md5&sign=2G8tg7DFHwihpNBLxLr7PA%3D%3D";
详细解释:
| 参数 | 类型 | 说明 |
|---|---|---|
mqtt_server | 字符串 | MQTT Broker地址(OneNET平台服务器) |
mqtt_port | 整数 | MQTT端口号 |
mqtt_user | 字符串 | 产品ID(OneNET平台分配) |
mqtt_client_id | 字符串 | 设备名称(需在平台创建) |
mqtt_password | 字符串 | 鉴权token(平台生成的访问令牌) |
MQTT端口说明:
1883  → MQTT标准端口(TCP,无加密)
8883  → MQTTS端口(TLS/SSL加密)
鉴权密码格式:
version=协议版本&res=资源路径&et=过期时间&method=加密方法&sign=签名
第13-15行:MQTT主题定义
const char* topic_property_post = "$sys/4FiB4c885l/ESP32_Study/thing/property/post";
const char* topic_property_reply = "$sys/4FiB4c885l/ESP32_Study/thing/property/reply";
const char* topic_property_set = "$sys/4FiB4c885l/ESP32_Study/thing/property/set";
详细解释:
OneNET主题格式:
$sys/{产品ID}/{设备名称}/thing/property/{操作}
主题功能说明:
| 主题后缀 | 作用 | 数据流向 | 操作方式 |
|---|---|---|---|
post | 设备上报数据 | 设备→云端 | Publish |
reply | 云端回复上报 | 云端→设备 | Subscribe |
set | 云端下发控制 | 云端→设备 | Subscribe |
MQTT主题知识:
- 主题用
/分隔,类似文件路径 $开头表示系统保留主题- 支持通配符:
+(单层)、#(多层)
示例:
// 设备操作
client.publish(topic_property_post, data);     // 发布数据
client.subscribe(topic_property_reply);        // 订阅回复
client.subscribe(topic_property_set);          // 订阅控制
第17-18行:JSON数据定义
const char* json_data = "{\"id\":\"123\",\"version\":\"1.0\",\"params\":{\"temperature\":{\"value\":50}}}";
详细解释:
转义字符说明:
\"- 转义的双引号- 因为字符串本身用
"包围,内部的"需要转义
格式化后的JSON:
{
  "id": "123",              // 消息唯一标识
  "version": "1.0",         // 协议版本号
  "params": {               // 参数对象
    "temperature": {        // 数据流名称(需在平台创建)
      "value": 50           // 上报的温度值
    }
  }
}
OneNET数据格式要求:
id- 消息ID(用于匹配请求和回复)version- 必须为 "1.0"params- 包含实际数据点temperature- 数据流标识符(需在平台预先定义)
全局对象和变量
第20-21行:创建客户端对象
WiFiClient espClient;
PubSubClient client(espClient);
详细解释:
第20行 - WiFi客户端:
WiFiClient espClient;
- 创建TCP/IP网络客户端对象
- 提供底层网络连接功能
- 负责WiFi数据传输
第21行 - MQTT客户端:
PubSubClient client(espClient);
- 创建MQTT协议客户端对象
- 基于WiFiClient进行通信
- 这是我们主要操作的对象
协议栈层次关系:
┌─────────────────┐
│  MQTT协议层     │ ← PubSubClient client
├─────────────────┤
│  TCP/IP层       │ ← WiFiClient espClient
├─────────────────┤
│  WiFi物理层     │ ← ESP32硬件
└─────────────────┘
第23-24行:全局变量定义
unsigned long lastPublish = 0;
bool isFirstConnect = true;
详细解释:
第23行 - 时间戳变量:
unsigned long lastPublish = 0;
| 属性 | 说明 |
|---|---|
| 类型 | unsigned long(无符号长整型) |
| 位数 | 32位 |
| 取值范围 | 0 ~ 4,294,967,295 |
| 用途 | 记录上次发布数据的时间 |
| 初始值 | 0 |
第24行 - 标志位变量:
bool isFirstConnect = true;
| 属性 | 说明 |
|---|---|
| 类型 | bool(布尔型) |
| 取值 | true 或 false |
| 用途 | 标记是否首次连接 |
| 作用 | 控制连接信息只输出一次 |
WiFi连接函数
第26-41行:setup_wifi() 函数
void setup_wifi() {
函数签名分析:
void- 无返回值setup_wifi- 函数名(自定义)()- 无参数
  Serial.println("
========== ESP32 Starting ==========");
串口输出:
Serial.println()- 输出并换行
  Serial.printf("Free memory: %d bytes
", ESP.getFreeHeap());
格式化输出:
Serial.printf()- 类似C语言的printf%d- 整数占位符ESP.getFreeHeap()- 获取剩余堆内存(字节)
用途: 监控内存使用情况,防止内存泄漏
  Serial.print("WiFi connecting");
  WiFi.mode(WIFI_STA);
WiFi模式设置:
| 模式 | 说明 | 应用场景 |
|---|---|---|
WIFI_STA | Station模式(客户端) | 连接到路由器 |
WIFI_AP | Access Point模式(热点) | 提供WiFi给其他设备 |
WIFI_AP_STA | 双模式 | 同时做客户端和热点 |
当前使用: WIFI_STA - 作为客户端连接到路由器
WiFi.begin(ssid, password);
开始连接WiFi:
- 参数1:WiFi名称(SSID)
- 参数2:WiFi密码
- 特性: 非阻塞函数,立即返回
- 实际连接在后台进行
  while (WiFi.status() != WL_CONNECTED) {
    delay(500);
    Serial.print(".");
  }
等待连接循环:
WiFi.status() 返回值:
| 状态常量 | 值 | 说明 |
|---|---|---|
WL_IDLE_STATUS | 0 | 空闲状态 |
WL_NO_SSID_AVAIL | 1 | 找不到指定SSID |
WL_SCAN_COMPLETED | 2 | 扫描完成 |
WL_CONNECTED | 3 | 已连接 ✓ |
WL_CONNECT_FAILED | 4 | 连接失败 |
WL_CONNECTION_LOST | 5 | 连接丢失 |
WL_DISCONNECTED | 6 | 已断开 |
循环逻辑:
检查状态 → 未连接? → 等待0.5秒 → 打印"." → 重复
              ↓ 已连接
           退出循环
  Serial.println();
  Serial.printf("✓ WiFi Connected | IP: %s
", WiFi.localIP().toString().c_str());
}
IP地址获取和转换:
WiFi.localIP()           // 返回 IPAddress 对象
  .toString()            // 转换为 String 对象
  .c_str()               // 转换为 C风格字符串 (const char*)
类型转换链:
IPAddress → String → const char*
为什么要转换?
printf需要C风格字符串%s占位符对应const char*类型
输出示例:
✓ WiFi Connected | IP: 192.168.1.100
MQTT回调函数
第43-50行:callback() 函数
void callback(char* topic, byte* payload, unsigned int length) {
函数参数详解:
| 参数 | 类型 | 说明 | 示例 |
|---|---|---|---|
topic | char* | 消息主题 | "$sys/.../property/reply" |
payload | byte* | 消息内容(字节数组) | [123, 34, 99, ...] |
length | unsigned int | 消息长度 | 42 |
回调机制:
云端发送消息
    ↓
PubSubClient接收
    ↓
自动调用 callback()
    ↓
你的处理代码执行
  Serial.print("
📩 ");
  for (unsigned int i = 0; i < length; i++) {
    Serial.print((char)payload[i]);
  }
  Serial.println("
");
}
消息打印逻辑:
为什么用循环?
payload是byte*数组,不是字符串- 没有结尾的
\0终止符 - 需要逐字节转换并打印
类型转换:
(char)payload[i] // byte → char
执行流程:
payload = [123, 34, 99, 111, 100, 101, 34, ...]
              ↓ 循环转换
字符串 = {"code": ...}
MQTT连接函数
第52-68行:reconnect() 函数
void reconnect() {
  if (client.connect(mqtt_client_id, mqtt_user, mqtt_password)) {
client.connect() 参数:
| 参数 | 说明 | 本例中的值 |
|---|---|---|
client_id | 客户端唯一标识 | "ESP32_Study" |
username | 用户名 | "4FiB4c885l" (产品ID) |
password | 密码 | OneNET鉴权token |
返回值:
true- 连接成功false- 连接失败
connect() 函数重载:
// 1. 无认证
connect(clientID)

// 2. 用户名密码认证
connect(clientID, username, password)

// 3. 带遗嘱消息
connect(clientID, username, password, willTopic, willQoS, willRetain, willMessage)

// 4. 清除会话
connect(clientID, username, password, willTopic, willQoS, willRetain, willMessage, cleanSession)
    if (isFirstConnect) {
      Serial.println("✓ MQTT Connected");
      Serial.println("========== Ready ==========
");
      isFirstConnect = false;
    }
首次连接控制:
逻辑:
首次连接?
  ├─ 是 → 显示信息 → 设为false
  └─ 否 → 跳过(不显示)
作用: 避免重连时重复输出"连接成功"信息
    client.subscribe(topic_property_reply);
    client.subscribe(topic_property_set);
订阅主题:
subscribe() 函数:
// 基本订阅(QoS 0)
subscribe(topic)

// 指定QoS级别
subscribe(topic, qos)
QoS服务质量等级:
| QoS | 名称 | 说明 | 特点 |
|---|---|---|---|
| 0 | At most once | 最多一次 | 可能丢失,最快 |
| 1 | At least once | 至少一次 | 可能重复,适中 |
| 2 | Exactly once | 恰好一次 | 最可靠,最慢 |
订阅后:
- 这两个主题的消息会触发
callback()函数 - 可以订阅多个主题
- 支持通配符(
+和#)
  } else {
    Serial.printf("✗ MQTT Failed: %d
", client.state());
  }
}
连接失败处理:
client.state() 状态码:
| 代码 | 常量名 | 说明 |
|---|---|---|
| -4 | MQTT_CONNECTION_TIMEOUT | 连接超时 |
| -3 | MQTT_CONNECTION_LOST | 连接丢失 |
| -2 | MQTT_CONNECT_FAILED | 连接失败 |
| -1 | MQTT_DISCONNECTED | 未连接 |
| 0 | MQTT_CONNECTED | 已连接 ✓ |
| 1 | MQTT_CONNECT_BAD_PROTOCOL | 协议版本错误 |
| 2 | MQTT_CONNECT_BAD_CLIENT_ID | 客户端ID无效 |
| 3 | MQTT_CONNECT_UNAVAILABLE | 服务不可用 |
| 4 | MQTT_CONNECT_BAD_CREDENTIALS | 认证失败 |
| 5 | MQTT_CONNECT_UNAUTHORIZED | 未授权 |
常见错误排查:
-2 → 检查网络连接
 4 → 检查用户名密码
 2 → 检查客户端ID是否重复
Setup初始化
第70-83行:setup() 函数
void setup() {
Arduino标准函数:
- 程序启动时自动调用
- 只执行一次
- 用于初始化设置
Serial.begin(115200);
串口初始化:
| 参数 | 说明 |
|---|---|
115200 | 波特率(bps - 每秒位数) |
常用波特率:
9600, 19200, 38400, 57600, 115200, 230400, 460800, 921600
注意: 必须与串口监视器设置一致!
delay(1000);
延时等待:
- 参数单位:毫秒(ms)
1000ms = 1秒- 作用: 等待串口稳定,避免初始乱码
setup_wifi();
调用WiFi连接函数:
- 这是一个阻塞调用
- 会等待WiFi连接成功才继续
- 包含连接重试逻辑
client.setServer(mqtt_server, mqtt_port);
设置MQTT服务器:
- 参数1:服务器地址
- 参数2:端口号
- 必须在
connect()之前调用
client.setCallback(callback);
设置消息回调:
- 参数:回调函数名
- 当收到订阅的消息时,自动调用该函数
- 必须在
subscribe()之前设置
client.setBufferSize(512);
设置缓冲区大小:
| 设置 | 说明 |
|---|---|
| 默认值 | 256字节 |
| 当前值 | 512字节 |
| 用途 | 存储接收/发送的MQTT消息 |
注意:
- 消息超过缓冲区会被截断
- 根据实际消息大小调整
- 太大会占用内存
建议值:
setBufferSize(256);   // 小消息
setBufferSize(512);   // 中等消息
setBufferSize(1024);  // 大消息
setBufferSize(2048);  // 超大消息(谨慎使用)
  reconnect();
}
首次连接MQTT:
- 调用连接函数
- 完成订阅设置
- setup()结束后进入loop()
Loop主循环
第85-108行:loop() 函数
void loop() {
Arduino主循环:
- 程序会不断重复执行
- 相当于
while(true) { loop(); } - 永不退出
if (!client.connected()) {
连接状态检查:
client.connected()返回true/false!是逻辑非运算符- 意思:如果MQTT未连接
static unsigned long lastAttempt = 0;
静态变量:
对比普通变量:
// 普通变量(每次loop都重置)
unsigned long lastAttempt = 0;  // 永远是0

// 静态变量(保持上次的值)
static unsigned long lastAttempt = 0;  // 保留历史值
静态变量特点:
- 只初始化一次
- 值在函数调用间保持
- 生命周期是整个程序运行期间
- 作用域仅限函数内部
示例:
void loop() {
    static int count = 0;
    count++;
    Serial.println(count);  // 1, 2, 3, 4, 5...
}
if (millis() - lastAttempt > 5000) {
时间间隔判断:
millis() 函数:
- 返回程序运行的毫秒数
- 类型:
unsigned long - 约50天后会溢出(重新从0开始)
时间计算逻辑:
当前时间 - 上次时间 > 间隔时间
示例:
第1次循环:
millis() = 1000, lastAttempt = 0
1000 - 0 = 1000 > 5000? 否,不执行

第2次循环:
millis() = 6000, lastAttempt = 0
6000 - 0 = 6000 > 5000? 是,执行重连
为什么这样设计?
- 避免频繁重连
- 减少服务器压力
- 节省电量
      lastAttempt = millis();
      reconnect();
    }
执行重连:
- 更新重连时间戳
- 调用reconnect()函数
- 等待5秒后才会再次尝试
  } else {
    client.loop();
MQTT消息处理:
client.loop() 的作用:
- 处理接收到的消息
- 维护MQTT心跳(keepalive)
- 发送缓冲区中的数据
- 检测连接状态
重要性:
- 必须频繁调用
- 建议在loop()中每次都调用
- 不调用会导致连接超时
错误示例:
void loop() {
    delay(10000);  // 长时间延时
    client.loop(); // 可能已经超时断开
}
正确示例:
void loop() {
    client.loop(); // 每次循环都调用
    // 其他代码...
}
    unsigned long now = millis();
    if (now - lastPublish > 30000) {
定时发送机制:
时间间隔:
30000ms = 30秒- 每30秒执行一次发送
时间判断流程:
获取当前时间
    ↓
当前时间 - 上次发送时间
    ↓
大于30秒?
    ├─ 是 → 执行发送
    └─ 否 → 跳过
lastPublish = now;
更新时间戳:
- 记录本次发送时间
- 用于下次间隔计算
if (client.publish(topic_property_post, json_data)) {
发布MQTT消息:
publish() 函数:
// 基本发布
publish(topic, payload)

// 指定保留标志
publish(topic, payload, retained)

// 指定长度
publish(topic, payload, length)

// 完整参数
publish(topic, payload, length, retained)
参数说明:
| 参数 | 类型 | 说明 | 示例 |
|---|---|---|---|
topic | const char* | 发布的主题 | "$sys/.../post" |
payload | const char* | 消息内容 | "{"id":"123",...}" |
retained | boolean | 保留消息标志 | false |
保留消息(Retained Message):
true- 服务器保留最后一条消息- 新订阅者会立即收到该消息
false- 不保留(默认)
返回值:
true- 发布成功false- 发布失败
        Serial.println("📤 Sent: temperature = 50");
      } else {
        Serial.println("✗ Send failed");
      }
    }
  }
}
发送结果反馈:
- 成功:显示"发送成功"
- 失败:显示"发送失败"
失败原因可能:
- MQTT未连接
- 网络问题
- 消息太大(超过缓冲区)
- 服务器拒绝
程序流程图
整体执行流程
┌─────────────┐
│   程序启动   │
└──────┬──────┘
       ↓
┌─────────────────────────┐
│      setup() 执行        │
├─────────────────────────┤
│  1. 初始化串口(115200)   │
│  2. 连接WiFi             │
│  3. 配置MQTT服务器       │
│  4. 设置回调函数         │
│  5. 首次连接MQTT         │
└──────┬──────────────────┘
       ↓
┌─────────────────────────┐
│    loop() 无限循环       │ ←─────┐
├─────────────────────────┤       │
│  检查MQTT连接状态         │       │
│  ├─ 未连接 → 5秒重连      │       │
│  └─ 已连接 → 继续         │       │
│                         │       │
│  client.loop()          │       │
│  ↓                      │       │
│  检查发送时间             │       │
│  └─ 30秒到 → 发送数据     │       │
│                         │       │
│  收到消息?               │       │
│  └─ 是 → callback()     │       │
└─────────┬───────────────┘       │
          └─────────────────────────┘
                重复执行
MQTT消息流程
设备端                         云端
  │                            │
  ├─────── publish ────────────→│ 上报数据
  │      (topic_post)           │
  │                            │
  │←────── reply ──────────────┤ 回复上报
  │      (topic_reply)          │
  │      触发callback()         │
  │                            │
  │←────── set ────────────────┤ 下发控制
  │      (topic_set)            │
  │      触发callback()         │
  │                            │
重连机制流程
┌──────────────┐
│ MQTT已连接?  │
└───┬──────────┘
    │ 否
    ↓
┌──────────────────┐
│ 距上次重连>5秒?  │
└───┬──────────────┘
    │ 是
    ↓
┌──────────────┐
│ 更新时间戳    │
└───┬──────────┘
    ↓
┌──────────────┐
│ 尝试连接      │
└───┬──────────┘
    │
    ├─ 成功 → 订阅主题 → 继续
    │
    └─ 失败 → 等待5秒 → 重试
定时发送流程
┌──────────────────┐
│ 获取当前时间(now) │
└────┬─────────────┘
     ↓
┌──────────────────────┐
│ now - lastPublish    │
│      > 30000ms?      │
└────┬─────────────────┘
     │ 是
     ↓
┌──────────────────┐
│ lastPublish = now │
└────┬─────────────┘
     ↓
┌──────────────────┐
│ publish(data)     │
└────┬─────────────┘
     │
     ├─ 成功 → 显示"发送成功"
     │
     └─ 失败 → 显示"发送失败"
关键概念总结
1. 阻塞 vs 非阻塞
阻塞函数:
while (WiFi.status() != WL_CONNECTED) {
    delay(500);  // 程序停在这里等待
}
- 程序停止执行,等待条件满足
- 期间无法处理其他任务
非阻塞函数:
WiFi.begin(ssid, password);  // 立即返回
// 连接在后台进行,程序继续执行
- 函数立即返回
- 任务在后台执行
2. 回调函数机制
// 第1步:定义回调函数
void callback(char* topic, byte* payload, unsigned int length) {
    // 处理消息
}

// 第2步:注册回调函数
client.setCallback(callback);

// 第3步:库在收到消息时自动调用
收到消息 → PubSubClient → 自动调用callback()
特点:
- 事件驱动
- 异步处理
- 解耦合
3. 定时器技巧
基本模式:
static unsigned long lastTime = 0;
unsigned long interval = 5000;  // 5秒

void loop() {
    unsigned long now = millis();
    if (now - lastTime > interval) {
        lastTime = now;
        // 执行定时任务
    }
}
优点:
- 不阻塞其他任务
- 精确时间控制
- 可以同时运行多个定时器
多个定时器示例:
static unsigned long timer1 = 0;
static unsigned long timer2 = 0;

void loop() {
    unsigned long now = millis();

    // 定时器1:每1秒
    if (now - timer1 > 1000) {
        timer1 = now;
        // 任务1
    }

    // 定时器2:每5秒
    if (now - timer2 > 5000) {
        timer2 = now;
        // 任务2
    }
}
4. MQTT核心操作
// 1. 配置服务器
client.setServer(server, port);

// 2. 设置回调
client.setCallback(callback);

// 3. 连接服务器
client.connect(clientID, user, pass);

// 4. 订阅主题(接收消息)
client.subscribe(topic);

// 5. 发布消息(发送消息)
client.publish(topic, payload);

// 6. 维持连接(必须频繁调用)
client.loop();
5. 字符串类型转换
// C风格字符串
const char* str1 = "Hello";

// Arduino String对象
String str2 = "World";

// 转换:String → const char*
const char* str3 = str2.c_str();

// 转换:IPAddress → String → const char*
const char* ip = WiFi.localIP().toString().c_str();
类型对比:
| 类型 | 特点 | 适用场景 |
|---|---|---|
const char* | C风格,不可变 | 常量字符串 |
char[] | C风格,可变 | 缓冲区 |
String | Arduino类,功能丰富 | 字符串操作 |
6. 内存管理
变量存储位置:
// 全局变量 → 静态内存(SRAM)
const char* mqtt_server = "...";

// 局部变量 → 栈内存
void setup() {
    int x = 10;  // 栈
}

// 动态分配 → 堆内存
String str = "Hello";  // 堆

// 静态变量 → 静态内存
void loop() {
    static int count = 0;  // 静态内存
}
检查内存:
ESP.getFreeHeap();      // 剩余堆内存
ESP.getHeapSize();      // 总堆内存
ESP.getMaxAllocHeap();  // 最大可分配块
7. 错误处理
网络连接错误:
if (WiFi.status() != WL_CONNECTED) {
    Serial.println("WiFi断开");
    // 重连逻辑
}
MQTT连接错误:
if (!client.connected()) {
    int state = client.state();
    Serial.printf("MQTT错误: %d
", state);
    // 根据错误码处理
}
发送失败:
if (!client.publish(topic, data)) {
    Serial.println("发送失败");
    // 重试或记录
}
8. 性能优化建议
1. 减少字符串操作:
// 不好:频繁创建String对象
void loop() {
    String msg = "Temp: " + String(temp);
    client.publish(topic, msg.c_str());
}

// 好:使用缓冲区
char buffer[50];
void loop() {
    sprintf(buffer, "Temp: %.1f", temp);
    client.publish(topic, buffer);
}
2. 避免长时间延时:
// 不好:阻塞loop
void loop() {
    delay(5000);  // 5秒内无法处理其他任务
    client.loop();
}

// 好:使用millis()定时
void loop() {
    client.loop();  // 每次都调用
    // 用millis()控制定时任务
}
3. 合理设置缓冲区:
// 根据实际消息大小设置
client.setBufferSize(512);  // 不要过大或过小
完整代码
#include <WiFi.h>
#include <PubSubClient.h>

// WiFi配置
const char* ssid = "Eighteen-WiFi";
const char* password = "zxcvbnm1818";

// MQTT配置
const char* mqtt_server = "mqtts.heclouds.com";
const int mqtt_port = 1883;
const char* mqtt_user = "4FiB4c885l";
const char* mqtt_client_id = "ESP32_Study";
const char* mqtt_password = "version=2018-10-31&res=products%2F4FiB4c885l%2Fdevices%2FESP32_Study&et=2106806220&method=md5&sign=2G8tg7DFHwihpNBLxLr7PA%3D%3D";

// MQTT主题
const char* topic_property_post = "$sys/4FiB4c885l/ESP32_Study/thing/property/post";
const char* topic_property_reply = "$sys/4FiB4c885l/ESP32_Study/thing/property/reply";
const char* topic_property_set = "$sys/4FiB4c885l/ESP32_Study/thing/property/set";

// JSON数据
const char* json_data = "{\"id\":\"123\",\"version\":\"1.0\",\"params\":{\"temperature\":{\"value\":50}}}";

WiFiClient espClient;
PubSubClient client(espClient);

unsigned long lastPublish = 0;
bool isFirstConnect = true;

void setup_wifi() {
  Serial.println("
========== ESP32 Starting ==========");
  Serial.printf("Free memory: %d bytes
", ESP.getFreeHeap());

  Serial.print("WiFi connecting");
  WiFi.mode(WIFI_STA);
  WiFi.begin(ssid, password);

  while (WiFi.status() != WL_CONNECTED) {
    delay(500);
    Serial.print(".");
  }

  Serial.println();
  Serial.printf("✓ WiFi Connected | IP: %s
", WiFi.localIP().toString().c_str());
}

void callback(char* topic, byte* payload, unsigned int length) {
  Serial.print("
📩 ");
  for (unsigned int i = 0; i < length; i++) {
    Serial.print((char)payload[i]);
  }
  Serial.println("
");
}

void reconnect() {
  if (client.connect(mqtt_client_id, mqtt_user, mqtt_password)) {

    if (isFirstConnect) {
      Serial.println("✓ MQTT Connected");
      Serial.println("========== Ready ==========
");
      isFirstConnect = false;
    }

    client.subscribe(topic_property_reply);
    client.subscribe(topic_property_set);

  } else {
    Serial.printf("✗ MQTT Failed: %d
", client.state());
  }
}

void setup() {
  Serial.begin(115200);
  delay(1000);

  setup_wifi();

  client.setServer(mqtt_server, mqtt_port);
  client.setCallback(callback);
  client.setBufferSize(512);

  reconnect();
}

void loop() {
  if (!client.connected()) {
    static unsigned long lastAttempt = 0;
    if (millis() - lastAttempt > 5000) {
      lastAttempt = millis();
      reconnect();
    }
  } else {
    client.loop();

    unsigned long now = millis();
    if (now - lastPublish > 30000) {
      lastPublish = now;

      if (client.publish(topic_property_post, json_data)) {
        Serial.println("📤 Sent: temperature = 50");
      } else {
        Serial.println("✗ Send failed");
      }
    }
  }
}
附录
常用ESP32函数
// 系统信息
ESP.getFreeHeap()          // 剩余内存
ESP.getChipModel()         // 芯片型号
ESP.getCpuFreqMHz()        // CPU频率
ESP.getSdkVersion()        // SDK版本

// WiFi函数
WiFi.begin()               // 连接WiFi
WiFi.disconnect()          // 断开WiFi
WiFi.status()              // WiFi状态
WiFi.localIP()             // 本地IP
WiFi.RSSI()                // 信号强度
WiFi.macAddress()          // MAC地址

// 时间函数
millis()                   // 毫秒时间戳
micros()                   // 微秒时间戳
delay()                    // 毫秒延时
delayMicroseconds()        // 微秒延时
PubSubClient常用函数
// 配置函数
setServer()                // 设置服务器
setCallback()              // 设置回调
setBufferSize()            // 设置缓冲区
setKeepAlive()             // 设置心跳间隔

// 连接函数
connect()                  // 连接服务器
connected()                // 检查连接状态
disconnect()               // 断开连接
state()                    // 获取状态码

// 消息函数
publish()                  // 发布消息
subscribe()                // 订阅主题
unsubscribe()              // 取消订阅
loop()                     // 消息处理(必须调用)